The first thing that the person delivering will be looking for when delivering mail to your house is your mailbox. It’s also quite likely to be a prominent feature visiting guests will look out for when visiting your home.
As it will be a permanent feature of your home your mailbox must be installed correctly. In addition, the mailbox will contain all your important documents or parcels, and hence, it is reasonably necessary to have it installed efficiently.
To install a mailbox fixed at your doorstep, it’s not necessary to go to the expense of having a professional tradesman do this. It’s something that anyone with basic DIY skills can accomplish.
By following just a few simple steps, you can easily learn how to install a mailbox at your home that will last for years to come. Therefore my intention in this article is to provide you with step-by-step guidance on how you can install a mailbox on your property.

Table of Contents
How to Install a Mailbox: Step-by-Step Guide
You will be amazed it is to install a mailbox when you follow these steps. No great DIY skills are needed either!
Purchase a new mailbox
Getting your hands on a good quality mailbox that is USPS compliant is the very first step. Don’t worry the USPS requirements are rather basic.
USPS Mailbox Requirements
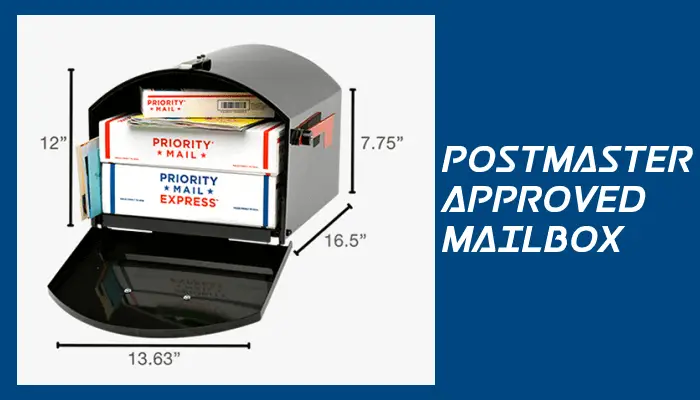
The new generation of extra-large mailboxes can now accept small parcels. I recommend using one of these as they are the most versatile, and approved for use by USPS.

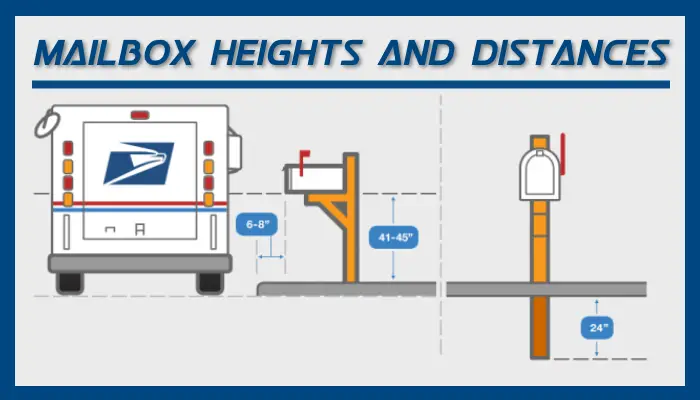
Once you have your mailbox its location needs to be measured. USPS lays out guidelines regarding this.
- Height Above the Ground: 41 – 45 inches
- Distance From the Curb: 6 – 8 inches

Something to be aware of from a safety perspective when you install a mailbox is that the box, and its supporting post, must not be made up of metal or any concrete that doesn’t bend or fall over when hit by any vehicle. The Federal Highway Administration recommends:
- A 4″ x 4″ wooden support or a
- 2″-diameter standard steel or aluminium pipe.
Digging a hole at an appropriate location.
Using the distances shown above you should mark this on the ground. Once the marking has been done, the next stage is digging out for the post. This can either be done by hand with a spade or you can rent a post-hole digger.
The hole that you dig must be deep enough for the mailbox to stand rigidly. It would help if you also made sure that once fitted the mailbox needs to be sturdy while keeping in mind that it cannot exceed the USPS guidance height of 41 – 45 inches above the ground.
When you install a mailbox the depth that I recommend is no deeper than 24 inches in the ground. This will ensure the perfect height and depth for your mailbox.
Inserting the mailbox post in concrete in the ground
Now that the spot on your lawn has been dug properly, the next step is to insert the mailbox there. Please make sure to go through the instructions twice if it comes with the mailbox.
It’s worth using a spirit level to ensure that your mailbox is installed straight.
Fix the post with concrete
The step that follows next is to pour concrete into the hole after the mailbox post has been placed in the ground. I prefer to use a fast setting, ready-mixed, concrete. It gets the job done way faster and easier. Prepare the concrete mix using the instructions on the bag and pour it around the post in the ground.
You must ensure an even spread of concrete mix, and on noticing even a slight shift in the mailbox, use the spirit level to realign the post properly.
Let the concrete dry
After you have made sure that the post has been set in the ground properly and the concrete mix has been poured evenly, the immediate step is to let it dry. The time for this will vary and will depend on the concrete mix you are using as well as the temperature. I suggest that you err on the side of caution and leave it to cure overnight.
Attach the mailbox to the post
After leaving the concrete to cure the next step when you install a mailbox is to finally attach the mailbox. Ordinarily, your mailbox will come with specific instructions to follow. This will ensure the best results.
Customize the mailbox according to your preference.
The last step, and probably the creative one, is to dress up your mailbox in any way you like.
Don’t forget to put your house number, or street number, on the mailbox, it is one of the requirements of the USPS. The letters or numbers have to be a minimum of 1 inch tall for them to appear properly.
Last but not least comes the part where you decorate your mailbox. Now, this part entirely depends on you and how you choose to have your mailbox look.
I would suggest planting a tiny garden around the concrete area left after the mailbox installation. Plants and flowers make them look natural and attractive.
Now that your mailbox is installed and ready to use, please do not forget to keep checking it periodically for rust or hinges that become loose.
Wall Mounted Boxes
On a side note, if you wish to install a wall-mount mailbox, here are some easy steps for you that will get you going.
● Measure the area and the wall where you want to install the mailbox.
● After the measurements, drill the holes in the wall at the points that you have marked.
● Install the hardware that needs to be fixed for mounting the mailbox.
● The last step includes the mailbox being hung from the hardware on the wall.
● All the screws must be drilled s
● Ensure that the mailbox hangs sturdily.
Conclusion – When you Install a Mailbox
Now that we have reached the end of this article on how to install a mailbox, I hope you found it quite helpful.
I’ve tried my best to provide step-by-step guidance on how to install a mailbox at your doorstep and have included every helpful detail possible but your circumstances may differ slightly.
Feel free to share this article showing how you can install a mailbox with your friends or acquaintances who need to get a mailbox installed.
Mail Box Full of Junk Mail?
If you are anything like I used to be then you get far too much junk mail and your mail box is overflowing. I’ve written an article explaining how you can solve this annoying problem. You can read it here – How Do You Stop Junk Mails From Being Delivered?
